Thermoforming: It is the combination of two wonds thermo and forming. The plastic sheat reteains the mould shape and detaire. The process involves checting thermoplastic sheatoits sohtening temp (pliable stale). Thermoforming requires more expensive sheet as raw stock, Thermoforming dies are made up of wood, plaster of Paris, aluminium and its cost is substantially low, If the number of articles to be moulded is less than the choice would be thermo forming.

OR
The process involves heating a plastic sheet until soft and then draping it over a mould. A vacuum is applied into the mould. The sheet is then ejected from the mould. In its advanced form, the vacuum forming process utilizes sophisticated pneumatic, hydraulic and heat controls thus enabling higher production speeds and more detailed vacuum formed applications.
The Process
The thermoforming process involves the following steps:
1. Extrusion of sheet
2. Place the sheet on a mould
3. Draw the sheet into the shape of the mould by heat and negative force (vacuum).
Application
Covers, displays, blister packaging, trays, drinking cups & food packaging.
A variety of thermoplastic materials can be used in these processes, including the following:
- Acrylic (PMMA)
- Polystyrene (PS)
- Polyvinyl Chloride (PVC)
- High-Density Polyethylene (HDPE)
- Polypropylene (PP)
- Acrylonitrile Butadiene Styrene (ABS)
The plastic seal surface generally referred to as the flange is located at the interface between the lidding stock and the plastic. This nominally flat surface --the remnant of the original plastic sheet used to form the tray--is probably the most vital element of the sterile barrier, since its flatness and consistency can be critical to the ability to seal the lidding to the tray. Proper design considerations must be followed in order to attain a consistent flange thickness.
The second major concern with thermoformed trays is sidewall integrity. This is especially important in EtO-sterilized trays that must withstand high pressure, heat, and moisture, as well as strong vacuum during the sterilization cycle. Any holes, tears, splits, gaps, or thin areas in the body of the tray will void the sterile barrier. Once again, careful design preparation is necessary to arrive at evenly thermoformed tray walls.
Application: Thermoforming process is used for a variety of applications, for example, food packaging, automotive parts, trays, building products and aircraft windscreens. Thick gauge parts are used as cosmetic surfaces on permanent structures such as trucks, medical equipment, material handling equipment, electrical and electronic equipment, spas and shower enclosures, vehicle door and dash panels, refrigerator liners, utility vehicle beds, and plastic pallets.
Advantages
1. Extremely adaptive to customer design needs
2. Rapid prototyping development
3. Material and process is optimized for cost effectiveness
4. High-speed production allows for just-in-time shipments
5. Flexible tooling design offers a competitive advantage
6. On-the-fly product enhancements with low additional costs
7. Visually pleasing appearance
8. Weight savings for consumer and manufacturer
9. Wider design scope
10. Lower tooling costs
11. Paintable and coloured plastic availability
12. Fully integrated process with limitless flexibility for small to large product designs
Disadvantages
1. High initial equipment investment
2. High start-up and running costs possible
3. Part must be designed for effective moulding
4. Accurate cost prediction for moulding job is difficult
Advantages of thermoforming over injection moulding
1. Large surface-area parts formed on inexpensive moulds and machines, due to low pressure and temperature requirements
2. Easy formation of very thin-walled parts that is difficult to make by other techniques.
3. Very high rates of production of thin-walled parts at relatively low capital investment.
Types of Thermoforming
1. Vacuum Forming
2. Plug assist forming
3. Vacuum snapback
4. Pressure Forming
5. Drape Forming
6. Twin sheet forming
1. Vacume forming: Achieving regularity in flange and sidewall design can be a major problem, because one of the hallmarks of the thermoforming process is its inconsistency. If 10 shots are formed, all 10 will be measurably different; the key is keeping the differences to a minimum. In the basic process, called vacuum forming, plastic sheet is heated past its deflection temperature, until it becomes semimolten and sags under gravity.

Often, vacuum forms are made using male molds, on which the sheet forms the bottom of the tray first, and is then pulled down to form the flange plane. This gives a stronger bottom to the tray, but tends to yield a much thinner flange and sidewalls. Irregularities can be overcome with increased sidewall draft and a thicker starting gauge, but these compensations make for a larger and more expensive part.
Advantages
1. Economical for small to medium production runs
2. Low tooling costs
3. Quick startup
4. High strength to weight ratio
5. Efficient prototyping
2. Plug-Assist Processing: Another processing improvement has been the use of plug assists in conjunction with pressure forming. These plugs are hobs shaped like the negative image of the mold; they permit further prestretching and preshaping of the plastic sheet on the pressure side of the vessel before vacuum is activated.
 This innovation has dramatically increased control over the thickness and quality of finished thermoformed parts, and has enabled processors to substantially reduce the starting thickness of the sheet needed to fashion a usable part. As one can tell from the foregoing descriptions, thermoforming is not really a scientific method. The process itself incorporates numerous variables and tolerances, and can easily be affected by changes in material, equipment, temperature, pressure, and, especially, mold design. If steps are taken to minimize the variability of the first four items--that is, if material is rigorously inspected for quality and consistency, and equipment developed that can regularly operate within a narrow range of forming variations (probably via computerized controls)--then the path to thermoforming better and more consistent medical trays depends on effective part and mold design.
Advantages
1. Better uniformity in wall thickness especially for cup or box shapes
2. Reduces stretching or thinning of material during forming
3. Vacuum Snap-Back:
1. Vacuum-snap back is an excellent and often used process for forming deep draw products with uniform wall thickness.
2. Vacuum is used to pre-stretch the hot plastic before the mould makes contact with the sheet.
3. Vacuum snap-back is more complex than plug assist but can produce deeper drawn products with better wall uniformity and less mark-off.
4. A vacuum pre-stretch box is required.
5. The pre-stretch box is sealed against the hot sheet and vacuum is applied.
6. The plastic is drawn into the box as a hemisphere with the height of the hemisphere usually controlled by a photocell.
The steps of vacuum snap-back are:
1. After the plastic sheet is heated and the sheet cart returns to the forming station, the bottom platen moves up sealing the vacuum pre-stretch box against the hot sheet.
2. Vacuum is then applied.
3. When the stretching plastic crosses the photocell beam, vacuum is turn off.
4. The mould is moved into the formed hemisphere. When the mould is sealed against the hot plastic, vacuum is applied to the mould and vacuum is released from the pre-stretch box causing the plastic to snap to the contours of the mould.
5. The pre-stretch box is then lowered and cooling air is blown against the hot plastic. 6. After the plastic cools, the mould vacuum is released, air eject is applied through the mould and then the mould is removed from the formed plastic part.
7. Placing the mould on the bottom platen and the pre-stretch box on the top platen will also work for vacuum snap-back.
Advantages
1. Well controlled part thickness
2. Though longer cycle times
4. Pressure forming: Over the years, advances in technology led to the method of pressure forming, in which parts are formed within a sealed vessel--a hermetic shell containing both the tooling and the plastic. In this process, the plastic sheet is prestretched through the application of positive air pressure on the side of the sheet away from the mold; the vacuum gate remains closed on the mold side of the vessel until prestretching is completed. The technique allows for a much more consistent wall thickness throughout the tray once the vacuum pulls the sheet against the mold to form its final shape.

Steps:
1. Material is heated to proper temp then moves over the mould.
2. Platens close and lock.
3. Vacuum and air pressure are applied.

Materials:
Theoretically, any thermoplastic material can be pressure formed.
Advantages:
1. Sharp, crisp lines and details
2. Low tooling costs
3. Short lead time
4. Textured surfaces and moulded in colors
5. Formed in undercuts
6. Ideal for short runs
7. Zero degree draft on sidewalls
8. Embossed and Debossed areas
9. Highly detailed openings
10. Superior, uniform tolerance control
Applications:
Pressure forming is used when the part will be the "face" of the product expecting a long life. You can pressure form a company logo or model designation with styling lines, surface texture or other features in a light weight and durable part.
5. Drape Forming:
Drape forming is similar to straight vacuum forming except that after the sheet is framed and heated, it is mechanically stretched and a pressure differential is then applied to form the sheet over a male mould.
However, the sheet touching the mould remains close to its original thickness.
It is possible to drape-form items with a depth-to-diameter ratio of approximately 4 to 1
Process steps
Step 1: The plastic sheet is clamped in a frame and heated. Heating can be timed or electronic sensors can be use to measure sheet temperature or sheet sag.

Step 2: Drawn over the mould: either by pulling it over the mould and creating a seal to the frame or by forcing the mould into the sheet and creating a seal. The platen can be driven pneumatically or with electric drive.

Step 3: Then vacuum is applied through the mould, pulling the plastic tight to the mould surface. A fan can be used to decrease sheet cooling time.

Step 4: After the plastic sheet has cooled, the vacuum is turned off and compressed air is sent to the mould to help free it from the plastic. The platen then moves down pulling the mould from the formed part. The formed sheet is unclamped, removed and a new cycle is ready to start.
Main techniques, differing by the position of the mould during the first stage.
1st Method: The sheet (without masking) is placed on top of the mould in its basic, flat state. Both sheet and mould are then slid into a hot-air circulating oven and heated to about 150-155°C (300-312°F). When the sheet (and mould) reaches the required temperature it sags and drapes over the heated mould. Both are then pulled out of the oven and quickly helped, by gloved hands, to conform more precisely to the mould. It is then allowed to cool down.
2nd Method: The sheet is placed into a hot-air circulating oven (without masking), and heated to about 150-155°C (300-312°F). When the sheet reaches the required temperature it is quickly pulled out of the oven and placed on top of the mould. there the sheet sags, aided quickly by the gloved helping hands, and takes the accurate shape of the mould. For better results we recommend pre-heating the mould to about 80-100°C (175-210°F) before putting the heated sheet on top. Then it is allowed to cool down.
Advantages:
1. Better part dimensional control on inside of part
2. Lower mould costs
3. Ability to grain surface (tubs, showers, counter tops, etc
4. Faster cycle times.
Disadvantage: More scrap due to larger clamps and trims area.
Applications:
1. Large panels that require retaining a simple non-flat shape as in a curved display wall.
2. Constructions of wide sections of odd-shaped walls that will still retain overall even material thickness.
6. Twin Sheet Forming:
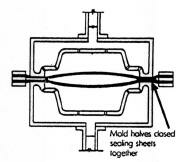
1. Twin-sheet thermoforming is a process in which two sheets of plastic can be formedsimultaneously with a separate mould on the top and bottom platens.
2. Once the plastic is moulded, it remains in the moulds and while still at its forming temperature the two moulds are brought together under high pressure and the two sheets are welded wherever the moulds dictate a weld.
3. The process creates 3 dimensional parts with formed features on both sides. The parts are typically very strong, stiff, and quite light-weight.
Materials: HMWHDPE, ABS, PC/ABS, Polycarbonate
Compared to blow-moulding, the twin-sheet process:
1. Tooling and machines are more cost-competitive for small to modest run sizes.
2. Each sheet may be a different thickness, material or color.
3. More flexibility with parting line structure is possible.
Compared to Rotomoulding, the twin-sheet process:
1. Many more resin types are available in twin-sheeting.
2. More structural beams can be created in twin-sheeting
3. Much higher production rates
Steps
Step 1: Two preheated thermoplastic sheets are simultaneously heated between the two moulds till they are are entirely plasticized.
 Step 2: On reaching the specific temperature, the two moulds move together. The two sheets are deep-drawn and tightly moulded to each other in one step.
 Step 3: To achieve a high level of detail or precision, the forming can be supported by high pressure and/or vacuum.
 Step 4: The hollow body without solvent, moulding additives and adhesives, is finished. Furthermore, there are no inner strain.

Applications:
Pallets, industrial dunnage, portable toilets, medical housings, surfboards, fuel tanks, air/ventilation ducts, electrical enclosures, recreational boats, cases, toys, marine products, doors, tables, spine boards and numerous transportation-related products.
Advantages
1. Increased structural integrity and rigidity
2. Enclosed cross-section capability
3. Low tooling cost
4. Internal reinforcement options: structural member, rigid foam, etc.
5. The process has some distinct advantages over blow-moulding and rotomoulding.
No comments:
Post a Comment